在现代前端开发中,脚手架(CLI 工具)已经成为不可或缺的开发工具。无论是 Vue CLI、Create React App 还是 Angular CLI,它们都能帮助我们快速搭建项目结构、统一团队规范、提高开发效率。
本文将带你从零开始实现一个功能完整的 Node.js 脚手架,涵盖命令行解析、用户交互、模板下载、文件操作等核心功能。通过本文,你将学会如何开发一个类似 Vue CLI 的命令行工具,并能将其发布到 npm 供他人使用。
让我们开始吧!
处理用户命令
我们期望能像 Vue CLI 一样,用 vue create xxx 命令就能创建一个 Vue 项目
为了能够解析用户命令,我们使用了 commander.js 库。
首先我们创建一个文件,路径为 ./bin/index.js
1
2
3
4
5
6
7
8
9
10
11
12
| #! /usr/bin/env node
const { program } = require('commander');
const create = require('../script/create.js');
program
.command('create <name>')
.description('创建项目')
.action(name => {
create(name);
});
program.parse();
|
必须要加第一行 #! /usr/bin/env node,将执行环境设置为 node,否则会报错:相关 StackOverflow 讨论
然后在 package.json 中增加如下配置
1
2
3
| "bin": {
"op": "./bin/index.js"
},
|
最后执行 npm link,将 bin 中的 op 命令注册成全局命令,这样我们就可以使用 op create 命令啦
支持查看版本
读取本地 package.json 中的 version 字段
1
2
3
| const packageJson = require('../package.json');
program.version(packageJson.version, '-v, --version');
|
交互式命令行(inquirer)
如果不满足于 commander.js 在一行内拼接大量参数的形式(开发者也难以记住复杂的参数用法),可以用 Inquirer.js 来做到交互式的命令行。
1
2
3
4
5
6
7
8
9
10
11
12
13
14
15
16
17
18
19
20
21
22
23
24
25
26
27
28
| const inquirer = require('inquirer');
inquirer.prompt([
{
name: 'vue',
type: 'checkbox',
message: 'Check the features needed for your project:',
choices: [
{
name: 'Babel',
checked: true,
},
{
name: 'TypeScript',
},
{
name: 'Progressive Web App (PWA) Support',
},
{
name: 'Router',
},
],
},
]).then((data) => {
console.log(data);
});
|
效果展示:

命令行 loading 效果(ora)
在脚手架执行耗时操作(如下载模板、安装依赖)时,为了提供更好的用户体验,我们需要显示一个 loading 动画,让用户知道程序正在运行中。ora 就是专门用来实现这个功能的库。
安装 ora:
实际应用示例:
1
2
3
4
5
6
7
8
9
10
11
12
13
14
15
16
17
18
| const ora = require('ora');
const download = require('download-git-repo');
async function downloadTemplate(repo, dest) {
const spinner = ora('正在下载项目模板...').start();
return new Promise((resolve, reject) => {
download(repo, dest, { clone: false }, (err) => {
if (err) {
spinner.fail('模板下载失败');
reject(err);
} else {
spinner.succeed('模板下载成功');
resolve();
}
});
});
}
|
ora 还支持其他状态:warn() 警告(黄色 ⚠)、info() 信息(蓝色 ℹ)
效果展示:

执行命令
在脚手架中,我们经常需要执行一些 shell 命令,比如 git clone 下载模板、npm install 安装依赖等。Node.js 提供了 child_process 模块来执行外部命令,但我们更推荐使用 execa,它是 child_process 的增强版本,提供了更好的 API 和错误处理。
安装 execa:
实际应用示例:
1
2
3
4
5
6
7
8
9
10
11
12
13
14
| const execa = require('execa');
const ora = require('ora');
async function installDependencies(projectName) {
const spinner = ora('正在安装依赖...').start();
try {
await execa('npm', ['install'], { cwd: projectName });
spinner.succeed('依赖安装成功');
} catch (error) {
spinner.fail('依赖安装失败');
throw error;
}
}
|
注意:如果使用 CommonJS (require),需要安装 execa v5 版本:npm install execa@5。execa v6+ 仅支持 ESM 模块。
execa 与其他工具对比
| 特性 |
child_process |
shelljs |
execa |
| API 风格 |
回调/事件 |
同步 |
Promise/Async |
| 错误处理 |
需手动处理 |
简单 |
完善,包含 stdout/stderr |
| 跨平台支持 |
需手动处理 |
良好 |
优秀 |
| 输出处理 |
需手动拼接 |
直接返回 |
自动清理和格式化 |
| 超时控制 |
需手动实现 |
不支持 |
原生支持 |
| 学习曲线 |
陡峭 |
平缓 |
平缓 |
| 性能 |
高 |
中等 |
高 |
| 适用场景 |
复杂场景 |
简单脚本 |
现代 Node.js 项目 |
推荐使用 execa 的理由:
- 现代化的 Promise API,配合 async/await 使用更优雅
- 更好的错误信息,包含完整的命令、退出码和输出
- 开箱即用的跨平台支持,无需担心 Windows 兼容性
- 活跃维护,社区支持良好
五颜六色的命令行
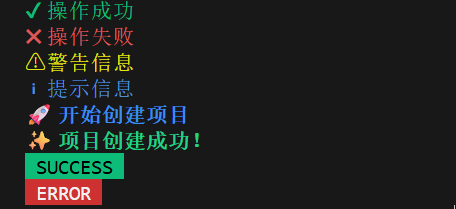
为了让命令行输出更加直观和美观,我们可以使用 chalk 库为文本添加颜色和样式。不同的颜色可以表示不同的状态:成功用绿色、失败用红色、警告用黄色等。
安装 chalk:
实际应用示例:
1
2
3
4
5
6
7
8
9
10
11
12
13
14
15
| const chalk = require('chalk');
console.log(chalk.green('✔ 操作成功'));
console.log(chalk.red('✖ 操作失败'));
console.log(chalk.yellow('⚠ 警告信息'));
console.log(chalk.blue('ℹ 提示信息'));
console.log(chalk.bold.blue('🚀 开始创建项目'));
console.log(chalk.bold.green('✨ 项目创建成功!'));
console.log(chalk.bgGreen.black(' SUCCESS '));
console.log(chalk.bgRed.white(' ERROR '));
|
常用颜色:green 成功、red 失败、yellow 警告、blue 提示、gray 次要信息。可以组合使用:chalk.bold.green() 加粗绿色、chalk.bgGreen.black() 绿色背景黑色文字。
效果展示:
下载模板
现在我们已经掌握了命令行的基础能力,接下来实现脚手架的核心功能 —— 从 Git 仓库下载项目模板。download-git-repo 是一个专门用于下载 Git 仓库的库。
安装依赖:
1
| npm install download-git-repo
|
实际应用示例(让用户选择模板):
1
2
3
4
5
6
7
8
9
10
11
12
13
14
15
16
17
18
19
20
21
22
23
24
25
26
27
28
29
30
31
32
33
34
35
36
37
38
| const inquirer = require('inquirer');
const download = require('download-git-repo');
const ora = require('ora');
const chalk = require('chalk');
const templates = {
'Vue 3': 'github:vuejs/create-vue',
'React': 'github:facebook/create-react-app',
'Vue 2': 'github:vuejs/vue'
};
async function create(projectName) {
const { template } = await inquirer.prompt([
{
name: 'template',
type: 'list',
message: '请选择项目模板:',
choices: ['Vue 3', 'React', 'Vue 2']
}
]);
const spinner = ora('正在下载模板...').start();
try {
await new Promise((resolve, reject) => {
download(templates[template], projectName, { clone: false }, (err) => {
if (err) reject(err);
else resolve();
});
});
spinner.succeed(chalk.green('模板下载成功'));
} catch (error) {
spinner.fail(chalk.red('模板下载失败'));
throw error;
}
}
|
支持的 Git 平台格式:
- GitHub:
github:user/repo
- GitLab:
gitlab:user/repo
- Gitee:
gitee:user/repo
- 指定分支:
github:user/repo#branch-name
文件操作
下载完模板后,我们通常需要对文件进行一些操作:复制文件、删除文件、创建目录等。Node.js 原生的 fs 模块虽然功能强大,但 API 比较原始。fs-extra 是 fs 的增强版本,提供了更多实用的方法。
安装 fs-extra:
常用 API:
fs.copy(src, dest) - 复制文件或目录fs.remove(path) - 删除文件或目录fs.ensureDir(path) - 确保目录存在,不存在则创建fs.readJson(file) / fs.writeJson(file, obj) - 读写 JSON 文件fs.pathExists(path) - 检查路径是否存在
实际应用示例:
1
2
3
4
5
6
7
8
9
10
11
12
13
14
15
16
17
18
19
20
21
22
| const fs = require('fs-extra');
const path = require('path');
const chalk = require('chalk');
async function setupProject(projectName) {
const dirs = ['src', 'src/components', 'src/utils', 'public', 'tests'];
for (const dir of dirs) {
await fs.ensureDir(path.join(projectName, dir));
}
const gitDir = path.join(projectName, '.git');
if (await fs.pathExists(gitDir)) {
await fs.remove(gitDir);
}
await fs.copy('template/config', path.join(projectName, 'config'));
console.log(chalk.green('✔ 项目结构创建完成'));
}
|
动态生成配置文件
在实际项目中,我们通常需要根据用户的选择动态生成配置文件,比如 package.json、.eslintrc 等。这时可以使用模板引擎来实现。ejs 是一个简单易用的模板引擎。
安装 ejs:
实际应用示例:
1. 创建模板文件 package.json.ejs:
1
2
3
4
5
6
7
8
9
10
11
12
| {
"name": "<%= projectName %>",
"version": "1.0.0",
"description": "<%= description %>",
"author": "<%= author %>",
"dependencies": {
"vue": "^3.3.0"
<% if (useRouter) { %>,
"vue-router": "^4.2.0"
<% } %>
}
}
|
2. 使用 ejs 渲染模板:
1
2
3
4
5
6
7
8
9
10
11
12
13
14
15
16
17
18
19
20
21
22
23
24
25
26
27
28
29
30
31
32
33
34
| const inquirer = require('inquirer');
const ejs = require('ejs');
const fs = require('fs-extra');
const path = require('path');
const chalk = require('chalk');
async function create(projectName) {
const answers = await inquirer.prompt([
{ name: 'description', message: '请输入项目描述:', default: 'A new project' },
{ name: 'author', message: '请输入作者名称:', default: 'Your Name' },
{
name: 'features',
type: 'checkbox',
message: '请选择项目特性:',
choices: [
{ name: 'TypeScript', value: 'typescript' },
{ name: 'Vue Router', value: 'router' }
]
}
]);
const template = await fs.readFile('./templates/package.json.ejs', 'utf-8');
const content = ejs.render(template, {
projectName,
description: answers.description,
author: answers.author,
useRouter: answers.features.includes('router')
});
await fs.writeFile(path.join(projectName, 'package.json'), content);
console.log(chalk.green('✔ 配置文件生成成功'));
}
|
自动安装依赖
项目创建完成后,自动安装依赖可以大大提升用户体验。我们需要检测用户使用的包管理器(npm/yarn/pnpm),然后执行相应的安装命令。
实际应用示例:
1
2
3
4
5
6
7
8
9
10
11
12
13
14
15
16
17
18
19
20
21
22
23
24
25
26
27
28
29
30
31
32
33
34
35
36
37
38
39
40
41
42
43
44
45
46
47
48
49
50
51
52
53
54
55
56
57
58
59
60
61
62
63
64
65
66
67
68
69
70
71
72
73
74
75
76
77
78
79
80
81
82
83
84
85
| const inquirer = require('inquirer');
const execa = require('execa');
const ora = require('ora');
const chalk = require('chalk');
const download = require('download-git-repo');
const templates = {
'Vue 3': 'github:vuejs/create-vue',
'React': 'github:facebook/create-react-app',
'Vue 2': 'github:vuejs/vue'
};
function downloadTemplate(template, projectName) {
return new Promise((resolve, reject) => {
download(templates[template], projectName, { clone: false }, (err) => {
if (err) reject(err);
else resolve();
});
});
}
async function getPackageManager() {
try {
await execa('pnpm', ['--version']);
return 'pnpm';
} catch (e) {
try {
await execa('yarn', ['--version']);
return 'yarn';
} catch (e) {
return 'npm';
}
}
}
async function create(projectName) {
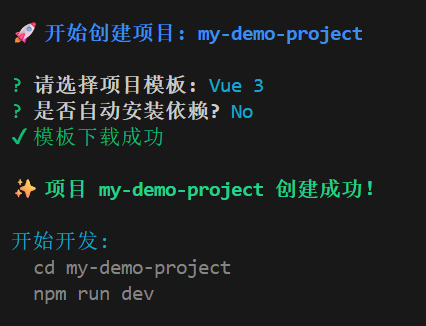
console.log(chalk.bold.blue(`\n🚀 开始创建项目: ${projectName}\n`));
try {
const answers = await inquirer.prompt([
{
name: 'template',
type: 'list',
message: '请选择项目模板:',
choices: ['Vue 3', 'React', 'Vue 2']
},
{
name: 'installDeps',
type: 'confirm',
message: '是否自动安装依赖?',
default: true
}
]);
const spinner = ora('正在下载模板...').start();
await downloadTemplate(answers.template, projectName);
spinner.succeed(chalk.green('模板下载成功'));
if (answers.installDeps) {
const pm = await getPackageManager();
const installSpinner = ora('正在安装依赖...').start();
try {
await execa(pm, ['install'], { cwd: projectName, stdio: 'inherit' });
installSpinner.succeed(chalk.green('依赖安装成功'));
} catch (error) {
installSpinner.fail(chalk.red('依赖安装失败'));
}
}
console.log(chalk.bold.green(`\n✨ 项目 ${projectName} 创建成功!\n`));
console.log(chalk.cyan('开始开发:'));
console.log(chalk.gray(` cd ${projectName}`));
console.log(chalk.gray(` npm run dev\n`));
} catch (error) {
console.log(chalk.red(`\n创建失败: ${error.message}\n`));
}
}
|
完整流程效果展示:
总结
通过本文,我们从零开始实现了一个功能完整的 Node.js 脚手架工具。让我们回顾一下涉及的核心技术栈:
核心依赖库:
- commander.js - 命令行参数解析
- inquirer.js - 交互式命令行
- ora - 命令行 loading 效果
- chalk - 命令行文字颜色
- execa - 执行 shell 命令
- download-git-repo - 下载 Git 仓库
- fs-extra - 增强的文件系统操作
- ejs - 模板引擎
重要提示:本文所有示例使用 CommonJS 模块系统(require/module.exports)。部分库的较新版本(v6+)仅支持 ESM,如需使用请安装指定版本或改用 ESM 模块系统。
完整开发流程:
- 使用 commander 处理用户命令
- 使用 inquirer 实现交互式选项
- 使用 ora 和 chalk 优化用户体验
- 使用 download-git-repo 下载项目模板
- 使用 fs-extra 进行文件操作
- 使用 ejs 动态生成配置文件
- 使用 execa 自动安装依赖
- 发布到 npm 供他人使用
进阶方向:
- 插件系统 - 支持用户自定义插件扩展功能
- 配置文件 - 支持通过配置文件自定义脚手架行为
- 更新检查 - 检测脚手架是否有新版本
- 模板管理 - 支持添加、删除、切换多个模板
- 单元测试 - 使用 Jest 等工具编写测试用例
- CI/CD - 配置自动化测试和发布流程
希望这篇文章能帮助你理解脚手架的实现原理,并动手开发出属于自己的命令行工具!
常见问题解答
1. 为什么运行 npm link 后命令找不到?
问题:执行 npm link 后,在终端输入命令提示 “command not found”。
解决方案:
- 检查
package.json 中 bin 字段配置是否正确
- 确认
bin 指向的文件第一行有 #! /usr/bin/env node
- Windows 用户可能需要以管理员身份运行
npm link
- 尝试重新打开终端或执行
npm unlink 后再次 npm link
2. 使用 require('execa') 报错怎么办?
问题:提示 “Cannot find module ‘execa’” 或 “require() of ES Module not supported”。
解决方案:
1
2
3
4
5
6
|
npm install execa@5
|
3. 下载模板时一直卡住或失败?
问题:执行 download-git-repo 下载模板时长时间无响应或报网络错误。
解决方案:
- 检查网络连接,GitHub 访问可能需要代理
- 使用国内镜像或 Gitee 仓库:
gitee:user/repo
- 添加超时处理和重试机制
- 考虑使用
degit 替代 download-git-repo
4. Windows 下路径分隔符问题?
问题:在 Windows 系统下路径使用 / 导致错误。
解决方案:
1
2
3
4
5
6
7
8
| const path = require('path');
const filePath = path.join(projectName, 'src', 'index.js');
|
5. 如何调试脚手架代码?
解决方案:
1
2
3
4
5
6
7
8
9
10
11
12
13
14
15
16
|
npm link
your-cli create test-project
node ./bin/index.js create test-project
{
"type": "node",
"request": "launch",
"name": "Debug CLI",
"program": "${workspaceFolder}/bin/index.js",
"args": ["create", "test-project"]
}
|
6. 脚手架如何支持 TypeScript?
解决方案:
1
2
3
4
5
6
7
8
9
10
11
12
13
14
|
npm install -D typescript @types/node ts-node
"bin": {
"my-cli": "./bin/index.js"
}
"scripts": {
"build": "tsc",
"prepublishOnly": "npm run build"
}
|
7. 如何让脚手架支持更新提示?
解决方案:
使用 update-notifier 库:
1
2
3
4
5
6
| const updateNotifier = require('update-notifier');
const pkg = require('../package.json');
const notifier = updateNotifier({ pkg });
notifier.notify();
|
参考
【前端架构必备】手摸手带你搭建一个属于自己的脚手架